此模組提供用於處理系統發育樹的類別、函式和 I/O 支援。
如需更完整的文件,請參閱Biopython 教學的「系統發生學」章節以及從原始碼產生的 Bio.Phylo API 頁面。Phylo 食譜頁面有更多關於如何使用此模組的範例,而 PhyloXML 頁面則說明如何將圖形提示和其他資訊附加到樹狀圖。
此模組包含在 Biopython 1.54 及更新版本中。如果您有興趣在下一個官方版本發佈之前測試此程式碼的較新新增功能,請參閱原始碼,以取得有關取得開發分支副本的說明。
若要繪製樹狀圖(可選),您還需要這些套件
to_networkx (和已棄用的函式 draw_graphviz)to_networkx (和已棄用的函式 draw_graphviz)I/O 和樹狀圖操作功能在沒有它們的情況下也能運作;當呼叫函式 draw()、draw_graphviz() 和 to_networkx() 時,它們會按需匯入。
Phylo 模組也已在 Jython 2.5.1 上成功測試,但缺少基於 Graphviz 和 NetworkX 的函式。但是,由於 Jython 使用不同版本的底層 XML 剖析程式庫,因此剖析 phyloXML 檔案的速度明顯較慢。
支援檔案格式的封裝程式可從模組的頂層取得
from Bio import Phylo
與 SeqIO 和 AlignIO 一樣,此模組提供四個 I/O 函式:parse()、read()、write() 和 convert()。每個函式都接受檔案名稱或開啟的檔案控制代碼,因此也可以從壓縮檔案、StringIO 物件等載入資料。如果檔案名稱以字串形式傳遞,則當函式完成時,該檔案將自動關閉;否則,您必須自行關閉控制代碼。
每個函式的第二個引數是目標格式。目前,支援下列格式
請參閱 PhyloXML 頁面,以取得更多關於使用樹狀物件的範例。
以增量方式剖析給定檔案或控制代碼中的每個樹狀圖,並傳回 Tree 物件的迭代器(即 Bio.Phylo.BaseTree Tree 類別的某個子類別,具體取決於檔案格式)。
>>> trees = Phylo.parse("phyloxml_examples.xml", "phyloxml")
>>> for tree in trees:
...     print(tree.name)
...
example from Prof. Joe Felsenstein's book "Inferring Phylogenies"
example from Prof. Joe Felsenstein's book "Inferring Phylogenies"
same example, with support of type "bootstrap"
same example, with species and sequence
same example, with gene duplication information and sequence relationships
similar example, with more detailed sequence data
network, node B is connected to TWO nodes: AB and C
...
如果只有一個樹狀圖,則結果產生器上的 next() 方法將傳回它。
>>> tree = Phylo.parse('phyloxml_examples.xml', 'phyloxml').next()
>>> tree.name
'example from Prof. Joe Felsenstein\'s book "Inferring Phylogenies"'
請注意,這不會立即顯示是否還有任何剩餘樹狀圖 – 如果您想要驗證這一點,請改用 read()。
從給定檔案或控制代碼剖析並傳回剛好一個樹狀圖。如果檔案包含零個或多個樹狀圖,則會引發 ValueError。如果您知道檔案只包含一個樹狀圖,則這很有用,可以直接載入該樹狀物件,而不是透過 parse() 和 next(),並作為安全檢查,以確保輸入檔案實際上在頂層包含剛好一個系統發育樹。
tree = Phylo.read("example.dnd", "newick")
print(tree)
如果您已將樹狀圖資料載入為 Python 字串,則可以在 StringIO(在 Python 的標準程式庫中)的幫助下剖析它
from cStringIO import StringIO

treedata = "(A, (B, C), (D, E))"
handle = StringIO(treedata)
tree = Phylo.read(handle, "newick")
一行程式碼
tree = Phylo.read(StringIO("(A, (B, C), (D, E))"), "newick")
其他 I/O 函式也可以與 StringIO 搭配使用。
(一般提示:如果您寫入 StringIO 物件並想要重新讀取內容,則需要呼叫 seek(0) 方法,將控制代碼移回 StringIO 資料的開頭 – 與開啟的檔案控制代碼相同。請參閱 Biopython 原始碼中 Phylo 的單元測試中的範例。
將 Tree 物件的序列寫入給定檔案或控制代碼。傳遞單個 Tree 物件而不是清單或可迭代物件也可以運作(請參閱,Phylo 是友好的)。
tree1 = Phylo.read("example1.xml", "phyloxml")
tree2 = Phylo.read("example2.xml", "phyloxml")
Phylo.write([tree1, tree2], "example-both.xml", "phyloxml")
給定兩個檔案(或控制代碼)和兩種格式,兩者都受 Bio.Phylo 支援,將第一個檔案從第一個格式轉換為第二個格式,並將輸出寫入第二個檔案。
Phylo.convert("example.nhx", "newick", "example2.nex", "nexus")
在 Phylo 模組內,有特定檔案格式的剖析器和寫入器,符合基本的頂層 API,有時還會新增其他功能。
PhyloXMLIO:支援 phyloXML 格式。有關詳細資訊,請參閱 PhyloXML 頁面。
NeXMLIO:支援 NeXML 格式。
NewickIO:Bio.Nexus.Trees 中剖析器的移植,以透過 Phylo API 支援 Newick(又名 New Hampshire)格式。
NexusIO:Bio.Nexus 周圍的封裝程式,以支援 Nexus 樹狀圖格式。
CDAOIO:支援比較資料分析本體 (CDAO)。需要 RDFlib。
Nexus 格式實際上包含幾種用於不同類型資料的子格式;為了表示樹狀圖,Nexus 提供一個區塊,其中包含一些中繼資料和一個或多個 Newick 樹狀圖(另一種 Nexus 區塊可以表示比對;這在 AlignIO 中處理)。因此,若要剖析完整 Nexus 檔案(已處理所有區塊類型),請直接使用 Bio.Nexus,若要僅擷取樹狀圖,請使用 Bio.Phylo。
基本物件在 Bio.Phylo.BaseTree 中定義。
為了支援儲存在特定檔案格式中的其他資訊,Tree 內的子模組提供了從 BaseTree 類別繼承的其他類別。
BaseTree.Tree 或 Node 的每個子類別都有一個類別方法,可以將物件從基本類型提升到特定格式的類型。這些子類別物件通常可以視為基本類型的執行個體,而無需任何明確的轉換。
PhyloXML:支援 phyloXML 格式。有關詳細資訊,請參閱 PhyloXML 頁面。
Newick:Newick 模組對 BaseTree 類別進行了微幅增強,並為與現有的 Bio.Nexus 模組相容性提供了一些墊片。此模組的 API 正在開發中,除了 BaseTree 已提供的功能之外,不應依賴於此模組。
一些其他工具位於 Bio.Phylo 下的 Utils 模組中。這些函式也會在匯入時載入到 Phylo 模組的頂層,以便於存取。
當需要第三方套件時,該套件會在呼叫函式本身時匯入,因此這些相依性對於安裝或使用 Tree 模組的其餘部分並非必要。
str(tree) 會產生整個樹狀圖的純文字表示法。字串會自動截斷,以確保合理的顯示。
將此與 print 函式搭配使用,以快速概觀您的樹狀圖
>>> tree = Phylo.parse('phyloxml_examples.xml', 'phyloxml').next()
>>> print(tree)
Phylogeny(description='phyloXML allows to use either a "branch_length"
attribute or element to indicate branch lengths.', name='example from
Prof. Joe Felsenstein s book "Inferring Phylogenies"')
    Clade()
        Clade(branch_length=0.06)
            Clade(branch_length=0.102, name='A')
            Clade(branch_length=0.23, name='B')
        Clade(branch_length=0.4, name='C')
...

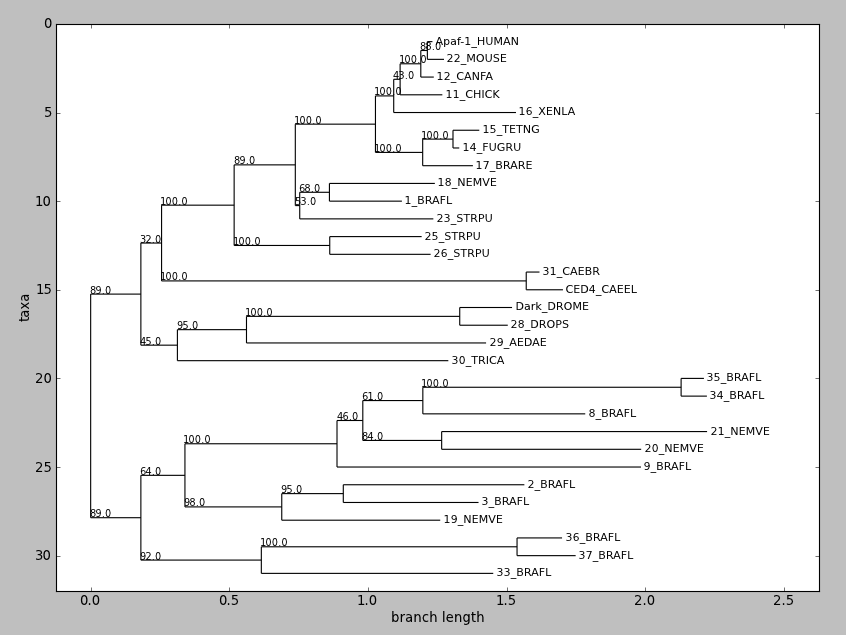
draw() 使用 Matplotlib 或 Pylab 顯示根系進化樹。Biopython 1.58 中的新功能。
嘗試此操作
tree = Phylo.read("apaf.xml", "phyloxml")
tree.ladderize()  # Flip branches so deeper clades are displayed at top
Phylo.draw(tree)
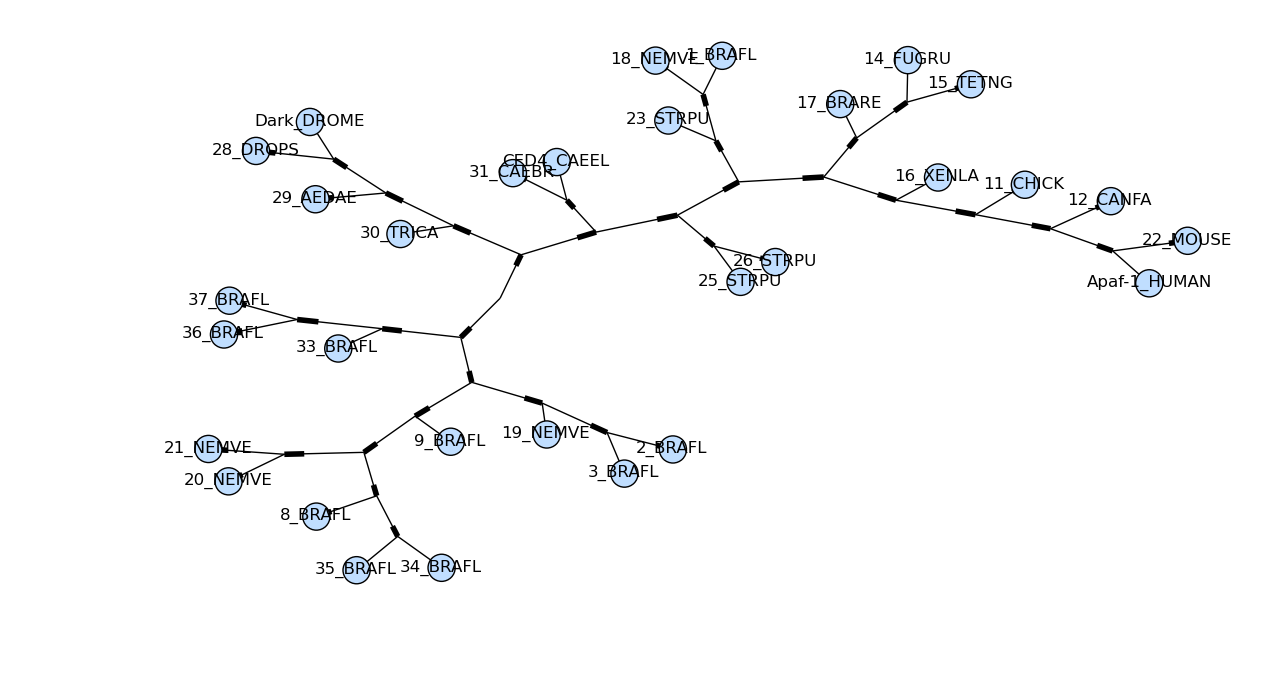
draw_graphviz 模仿同名的 networkx 函式,並進行了一些調整以改善圖表的顯示。如果給定檔案名稱,則該圖表會直接繪製到該檔案,並且可以使用影像格式等選項(預設為 PDF)。

遺憾的是,draw_graphviz 繪製的圖表具有誤導性,因此我們已棄用此方法。會忽略分支長度,而圖表中節點之間的距離是任意的,這是根據 graphviz 配置引擎所決定的。但它乍看之下像是一個正確的徑向系統發育圖,這可能會導致對資料的錯誤解釋。使用者最好使用其他程式庫(如 ETE 或 DendroPy)建立徑向圖,或者僅使用 Phylo.draw 產生的簡單矩形圖。
先決條件:除了 NetworkX 之外,您還需要 Graphviz、Matplotlib 以及 PyGraphviz 或 pydot 的本機安裝。
繪製基本樹狀圖很簡單
import pylab

tree = Phylo.read("apaf.xml", "phyloxml")
Phylo.draw_graphviz(tree)
pylab.show()

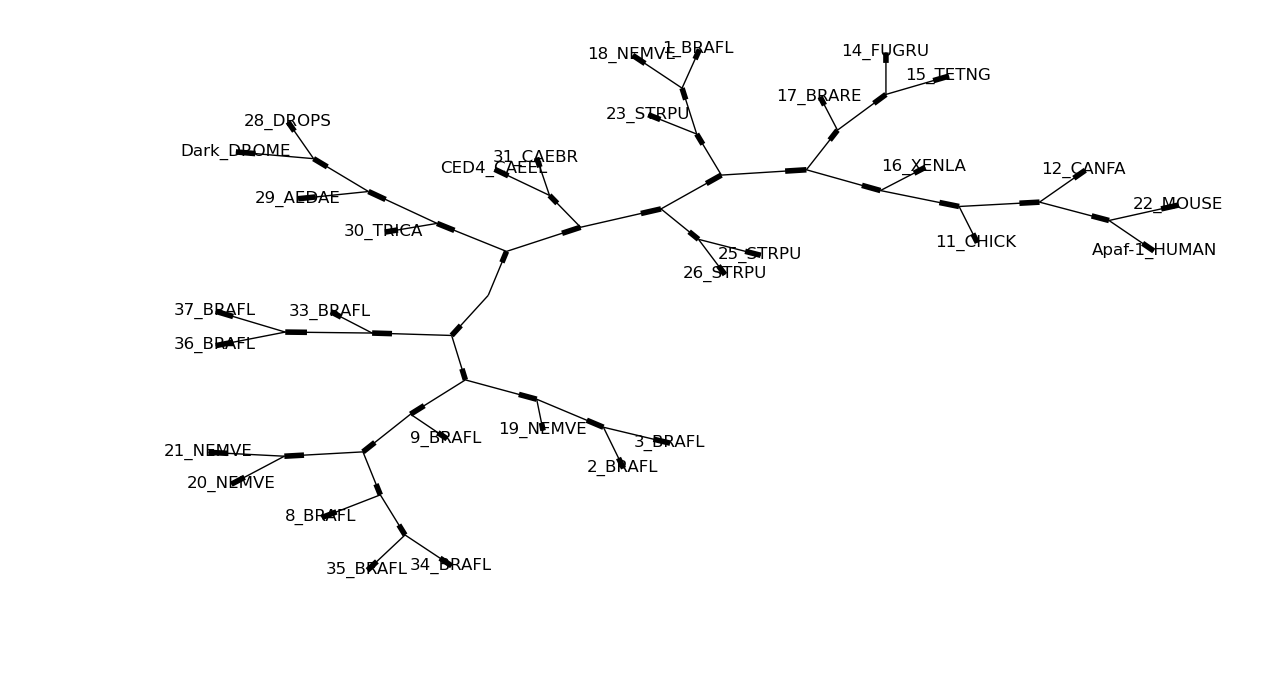
這是同一棵樹,但每個標示節點都沒有圓圈
Phylo.draw_graphviz(tree, node_size=0)
請參閱 Phylo 食譜頁面,以取得更多繪圖功能和選項。
draw_ascii 會將 ascii-art 根系進化樹列印到標準輸出,或指定的另一個檔案控制代碼。僅顯示終端節點標籤;這些是 str(clade) 的結果(通常是演化支名稱)。用於繪圖的文字欄位的寬度預設為 80 個字元,可使用 column_width 關鍵字引數調整,而字元列的高度是樹狀圖中終端數量的兩倍。
具有定義分支長度的簡單樹狀圖如下所示
>>> tree = Phylo.parse('phyloxml_examples.xml', 'phyloxml').next()
>>> Phylo.draw_ascii(tree)
          _____________ A
  _______|
_|       |_______________________________ B
 |
 |_______________________________________________________ C
相同的拓撲結構在沒有分支長度的情況下,會繪製成等長的分支
                              ___________________________ A
  ___________________________|
_|                           |___________________________ B
 |
 |___________________________ C
一個較大的樹狀圖 (apaf.xml, 31 個葉節點),使用預設的欄寬繪製,展示了如何處理相對較短的分支
>>> apaf = Phylo.read('apaf.xml', 'phyloxml')
>>> Phylo.draw_ascii(apaf)
                                   _ 22_MOUSE
                                  |
                                 _| Apaf-1_HUMAN
                                | |
                               ,| | 12_CANFA
                               ||
                              _||___ 11_CHICK
                             | |
                             | |___________ 16_XENLA
                      _______|
                     |       |       , 14_FUGRU
                     |       |     __|
                     |       |____|  |__ 15_TETNG
                _____|            |
               |     |            |____ 17_BRARE
               |     |
               |     |    ______ 1_BRAFL
               |     | __|
         ______|     ||  |_________ 18_NEMVE
        |      |      |
        |      |      |____________ 23_STRPU
        |      |
       _|      |          _________ 26_STRPU
      | |      |_________|
      | |                |________ 25_STRPU
      | |
      | |                                    ___ CED4_CAEEL
      | |___________________________________|
  ____|                                     |_ 31_CAEBR
 |    |
 |    |                                ___ 28_DROPS
 |    |          _____________________|
 |    |   ______|                     |____ Dark_DROME
 |    |  |      |
 |    |__|      |_______________________ 29_AEDAE
 |       |
 |       |__________________________ 30_TRICA
 |
 |                                                           _ 34_BRAFL
 |                                 _________________________|
_|                           _____|                         |_ 35_BRAFL
 |                          |     |
 |                        __|     |_______________ 8_BRAFL
 |                       |  |
 |                       |  |        ___________________ 20_NEMVE
 |         ______________|  |_______|
 |        |              |          |__________________________ 21_NEMVE
 |        |              |
 |     ___|              |______________________________ 9_BRAFL
 |    |   |
 |    |   |                _____________ 3_BRAFL
 |    |   |          _____|
 |    |   |_________|     |_________________ 2_BRAFL
 |____|             |
      |             |_______________ 19_NEMVE
      |
      |                                     _____ 37_BRAFL
      |            ________________________|
      |___________|                        |____ 36_BRAFL
                  |
                  |______________________ 33_BRAFL
雖然任何系統發生樹都可以合理地用有向無環圖表示,但 Phylo 模組並未嘗試提供一般可用的圖形庫,僅提供表示系統發生樹的最低限度功能。相反地,它提供了使用第三方函式庫將 Tree 物件匯出為標準圖形表示形式、鄰接列表 (dict) 和鄰接矩陣的函式。
to_networkx 會將給定的樹狀圖回傳為 NetworkX 的 LabeledDiGraph 或 LabeledGraph 物件 (取決於樹狀圖是否有根)。您可能需要直接匯入 NetworkX,才能對圖形物件執行後續操作。從這裡您也可以嘗試使用 NetworkX 的其中一個繪圖函式來顯示樹狀圖,對於簡單、完全標記的樹狀圖,它甚至可以運作,但是使用 Phylo 自己的 draw_graphviz 函式會有更好的結果,如上所述。
import networkx, pylab

tree = Phylo.read("example.xml", "phyloxml")
net = Phylo.to_networkx(tree)
networkx.draw(net)
pylab.show()
匯出至其他函式庫的範例,包括 ape (透過 Rpy2) 和 PyCogent,可在 Phylo 食譜頁面中找到。
Yanbo Ye 為 Google Summer of Code 2013 開發了許多用於建立和處理系統發生樹的新功能。這些功能可在開發分支中取得 (請參閱 原始碼),但尚未包含在官方的 Biopython 發行版本中。請注意,這些功能的行為和 API 在即將發行的正式版本之前可能會有所變更。
除了樹狀圖建構程式的包裝器 (透過 Bio.Emboss.Applications 中的 EMBOSS 包裝器處理 PHYLIP 程式) 之外,現在 Biopython 還在 Bio.Phylo.TreeConstruction 模組中提供數種以純 Python 實作的樹狀圖建構演算法。
所有演算法都設計為基底類別 TreeConstructor 的工作子類別。所有建構函式都有相同的方法 build_tree,該方法接受 MultipleSeqAlignment 物件以建構樹狀圖。目前有兩種樹狀圖建構函式:DistanceTreeConstructor 和 ParsimonyTreeConstructor。
DistanceTreeConstructor 有兩種演算法:UPGMA (未加權組平均法) 和 NJ (鄰近連結法)。
兩種演算法都基於距離矩陣建構樹狀圖。因此在使用這些演算法之前,讓我們先介紹 DistanceCalculator,以從 MultipleSeqAlignment 物件產生距離矩陣。以下程式碼顯示了一種常見的做法
>>> from Bio.Phylo.TreeConstruction import DistanceCalculator
>>> from Bio import AlignIO
>>> aln = AlignIO.read('Tests/TreeConstruction/msa.phy', 'phylip')
>>> print(aln)
Alignment with 5 rows and 13 columns
AACGTGGCCACAT Alpha
AAGGTCGCCACAC Beta
GAGATTTCCGCCT Delta
GAGATCTCCGCCC Epsilon
CAGTTCGCCACAA Gamma
>>> calculator = DistanceCalculator('identity')
>>> dm = calculator.get_distance(aln)
>>> dm
DistanceMatrix(names=['Alpha', 'Beta', 'Gamma', 'Delta', 'Epsilon'], matrix=[[0], [0.23076923076923073, 0], [0.3846153846153846, 0.23076923076923073, 0], [0.5384615384615384, 0.5384615384615384, 0.5384615384615384, 0], [0.6153846153846154, 0.3846153846153846, 0.46153846153846156, 0.15384615384615385, 0]])
>>> print(dm)
Alpha   0
Beta    0.230769230769  0
Gamma   0.384615384615  0.230769230769  0
Delta   0.538461538462  0.538461538462  0.538461538462  0
Epsilon 0.615384615385  0.384615384615  0.461538461538  0.153846153846  0
    Alpha   Beta    Gamma   Delta   Epsilon
如您所見,我們使用字串 'identity' 建立 DistanceCalculator 物件,該字串是計算距離的模型 (評分矩陣) 名稱。'identity' 模型是預設模型,可用於 DNA 和蛋白質序列。若要檢查 DNA、蛋白質或所有可用的模型,請分別使用計算器的屬性 dna_models、protein_models、models。
使用模型建立計算器後,只需使用 get_distance() 方法即可取得給定比對物件的距離矩陣。然後您會取得 DistanceMatrix 物件,它是 Matrix 的子類別 (我們稍後會討論這個)。
現在,讓我們回到 DistanceTreeConstructor。我們可以傳遞 DistanceCalculator 物件和字串參數 ('nj' 或 'upgma') 來初始化它,然後呼叫其 build_tree() 方法,如先前所述。
>>> from TreeConstruction import DistanceTreeConstructor
>>> constructor = DistanceTreeConstructor(calculator, 'nj')
>>> tree = constructor.build_tree(aln)
>>> print(tree)
Tree(rooted=False)
    Clade(branch_length=0, name='Inner3')
        Clade(branch_length=0.182692307692, name='Alpha')
        Clade(branch_length=0.0480769230769, name='Beta')
        Clade(branch_length=0.0480769230769, name='Inner2')
            Clade(branch_length=0.278846153846, name='Inner1')
                Clade(branch_length=0.0512820512821, name='Epsilon')
                Clade(branch_length=0.102564102564, name='Delta')
            Clade(branch_length=0.144230769231, name='Gamma')
雖然有時您可能想要直接使用您自己的 DistanceMatrix,而不是原始的比對,我們提供了另一種直接使用這兩種演算法的方式。
>>> from TreeConstruction import DistanceTreeConstructor
>>> constructor = DistanceTreeConstructor()
>>> tree = constructor.nj(dm)
>>> print(tree)
Tree(rooted=False)
    Clade(branch_length=0, name='Inner3')
        Clade(branch_length=0.182692307692, name='Alpha')
        Clade(branch_length=0.0480769230769, name='Beta')
        Clade(branch_length=0.0480769230769, name='Inner2')
            Clade(branch_length=0.278846153846, name='Inner1')
                Clade(branch_length=0.0512820512821, name='Epsilon')
                Clade(branch_length=0.102564102564, name='Delta')
            Clade(branch_length=0.144230769231, name='Gamma')
>>> tree = constructor.upgma(dm)
>>> print(tree)
Tree(rooted=True)
    Clade(branch_length=0, name='Inner4')
        Clade(branch_length=0.1875, name='Inner1')
            Clade(branch_length=0.0769230769231, name='Epsilon')
            Clade(branch_length=0.0769230769231, name='Delta')
        Clade(branch_length=0.110576923077, name='Inner3')
            Clade(branch_length=0.0384615384615, name='Inner2')
                Clade(branch_length=0.115384615385, name='Gamma')
                Clade(branch_length=0.115384615385, name='Beta')
            Clade(branch_length=0.153846153846, name='Alpha')
與 DistanceTreeConstructor 不同,ParsimonyTreeConstructor 的具體演算法委派給兩個不同的工作類別:ParsimonyScorer,透過給定的比對來計算目標樹狀圖的簡約評分;以及 TreeSearcher,搜尋使簡約評分最小化的最佳樹狀圖。典型的用法範例如下
>>> from Bio import AlignIO
>>> from TreeConstruction import *
>>> aln = AlignIO.read(open('Tests/TreeConstruction/msa.phy'), 'phylip')
>>> starting_tree = Phylo.read('Tests/TreeConstruction/nj.tre', 'newick')
>>> scorer = ParsimonyScorer()
>>> searcher = NNITreeSearcher(scorer)
>>> constructor = ParsimonyTreeConstructor(searcher, starting_tree)
>>> pars_tree = constructor.build_tree(aln)
>>> print(pars_tree)
Tree(weight=1.0, rooted=True)
    Clade(branch_length=0.0)
        Clade(branch_length=0.197335, name='Inner1')
            Clade(branch_length=0.13691, name='Delta')
            Clade(branch_length=0.08531, name='Epsilon')
        Clade(branch_length=0.041935, name='Inner2')
            Clade(branch_length=0.01421, name='Inner3')
                Clade(branch_length=0.17523, name='Gamma')
                Clade(branch_length=0.07477, name='Beta')
            Clade(branch_length=0.29231, name='Alpha')
ParsimonyScorer 是 Fitch 演算法和 Sankoff 演算法的組合。如果未提供任何參數,它會預設作為 Fitch 演算法運作;如果提供簡約評分矩陣 (一個 Matrix 物件),則作為 Sankoff 演算法運作。
然後,評分器會傳遞給 TreeSearcher,以告知它在搜尋期間如何評估不同的樹狀圖。目前,只實作了一個搜尋器 NNITreeSearcher,即最近鄰居交換 (NNI) 演算法。
將搜尋器和起始樹狀圖傳遞給 ParsimonyTreeConstructor,我們最終會取得它的執行個體。如果未提供起始樹狀圖,則會改為建立一個簡單的 upgma 樹狀圖,並使用 'identity' 模型。若要使用此簡約建構函式,只需使用比對呼叫 build_tree 方法即可。
與樹狀圖建構演算法相同,Bio.Phylo.Consensus 模組中也實作了三種純 Python 的共識樹演算法 (嚴格、多數規則和亞當共識)。您可以直接呼叫 strict_consensus、majority_consensus 和 adam_consensus,將樹狀圖清單作為輸入來使用這些演算法。
from Bio import Phylo
from Bio.Phylo.Consensus import *

trees = list(Phylo.parse("Tests/TreeConstruction/trees.tre", "newick"))
strict_tree = strict_consensus(trees)
majority_tree = majority_consensus(trees, 0.5)
adam_tree = adam_consensus(trees)
除了使用 50% 作為截止值之外,majority_consensus 方法還允許您透過提供額外的 cutoff 參數 (0~1,預設值為 0) 來設定自己的截止值。這表示當 cutoff 等於 1 時,它也可以作為嚴格共識演算法運作。與嚴格和亞當共識樹狀圖不同的另一件事是,結果多數規則共識樹狀圖具有在計算期間自動指派的分支支持值。
若要取得共識樹,我們必須建構一個自助複製樹狀圖的清單。因此在 Bio.Phylo.Consensus 模組中,我們也提供了幾種有用的自助方法來達成此目的。
from Bio import Phylo
from Bio.Phylo.Consensus import *

msa = AlignIO.read("Tests/TreeConstruction/msa.phy", "phylip")
msas = bootstrap(msa, 100)
如您所見,bootstrap 方法接受 MultipleSeqAlignment 物件,並產生其 100 次的自助複製。然後您可以使用它們來建構複製樹狀圖。此外,我們也提供了一種方便的方法來執行此操作。
calculator = DistanceCalculator("blosum62")
constructor = DistanceTreeConstructor(calculator)
trees = bootstrap_trees(msa, 100, constructor)
這次我們將額外的 DistanceTreeConstructor 物件傳遞給 bootstrap_trees 方法,最後取得複製樹狀圖。請注意,bootstrap 和 bootstrap_trees 都是產生器函式。您需要使用 list() 函式將結果轉換為比對或樹狀圖的清單。
另一個有用的函式是 bootstrap_consensus。透過將共識方法作為另一個額外的參數傳遞,我們可以直接取得共識樹。
consensus_tree = bootstrap_consensus(msa, 100, constructor, majority_consensus)
若要取得特定樹狀圖的分支支持,我們可以使用 get_support 方法。
from Bio import Phylo
from Bio.Phylo.Consensus import *

trees = list(Phylo.parse("Tests/TreeConstruction/trees.tre", "newick"))
target_tree = trees[0]
support_tree = get_support(target_tree, trees)
在以上程式碼中,我們使用第一個樹狀圖作為我們要計算其分支支持的目標樹狀圖。get_support 方法接受目標樹狀圖和樹狀圖清單,並回傳一個樹狀圖,其中所有內部演化枝都已指派分支支持值。
在 TreeConstruction 和 Consensus 模組中還有一些其他類別在這些演算法中使用。它們可能不常用,但在某些情況下可能對您很有用。
TreeConstruction 模組中的 _Matrix 類別是 _DistanceMatrix 的超類別。它們實際上都是由名稱清單和較低下三角矩陣格式的數字巢狀清單建構而成的。它們之間唯一的區別在於,無論指派什麼值,_DistanceMatrix 中的對角線元素都會全部為 0。
若要建立 _Matrix 物件
>>> from Bio.Phylo.TreeConstruction import _Matrix
>>> names = ['Alpha', 'Beta', 'Gamma', 'Delta']
>>> matrix = [[0], [1, 0], [2, 3, 0], [4, 5, 6, 0]]
>>> m = _Matrix(names, matrix)
>>> m
_Matrix(names=['Alpha', 'Beta', 'Gamma', 'Delta'], matrix=[[0], [1, 0], [2, 3, 0], [4, 5, 6, 0]])
>>> print(m)
Alpha   0
Beta    1   0
Gamma   2   3   0
Delta   4   5   6   0
    Alpha   Beta    Gamma   Delta
您可以使用兩個索引來取得或指派矩陣中的元素,且索引可互換。
>>> m[1,2]
3
>>> m[2,1]
3
>>> m['Beta','Gamma']
3
>>> m['Beta','Gamma'] = 4
>>> m['Beta','Gamma']
4
此外,您可以使用一個索引來取得或指派與該索引相關的元素清單
>>> m[0]
[0, 1, 2, 4]
>>> m['Alpha']
[0, 1, 2, 4]
>>> m['Alpha'] = [0, 7, 8, 9]
>>> m[0]
[0, 7, 8, 9]
>>> m[0,1]
7
您也可以依索引刪除或插入元素的欄和列
>>> m
_Matrix(names=['Alpha', 'Beta', 'Gamma', 'Delta'], matrix=[[0], [7, 0], [8, 4, 0], [9, 5, 6, 0]])
>>> del m['Alpha']
>>> m
_Matrix(names=['Beta', 'Gamma', 'Delta'], matrix=[[0], [4, 0], [5, 6, 0]])
>>> m.insert('Alpha', [0, 7, 8, 9] , 0)
>>> m
_Matrix(names=['Alpha', 'Beta', 'Gamma', 'Delta'], matrix=[[0], [7, 0], [8, 4, 0], [9, 5, 6, 0]])
_BitString 是 Consensus 模組中演算法中經常使用的輔助類別。它是只接受兩個字元 ('0' 和 '1') 的 str 物件子類別,具有用於二進位式操作 (& | ^ ~) 的其他函式。常見的用法如下
>>> from Bio.Phylo.Consensus import _BitString
>>> bitstr1 = _BitString('11111')
>>> bitstr2 = _BitString('11100')
>>> bitstr3 = _BitString('01101')
>>> bitstr1
_BitString('11111')
>>> bitstr2 & bitstr3
_BitString('01100')
>>> bitstr2 | bitstr3
_BitString('11101')
>>> bitstr2 ^ bitstr3
_BitString('10001')
>>> bitstr2.index_one()
[0, 1, 2]
>>> bitstr3.index_one()
[1, 2, 4]
>>> bitstr3.index_zero()
[0, 3]
>>> bitstr1.contains(bitstr2)
True
>>> bitstr2.contains(bitstr3)
False
>>> bitstr2.independent(bitstr3)
False
>>> bitstr2.independent(bitstr4)
True
>>> bitstr1.iscompatible(bitstr2)
True
>>> bitstr2.iscompatible(bitstr3)
False
>>> bitstr2.iscompatible(bitstr4)
True
在共識和分支支持演算法中,它用於計算和儲存多個樹狀圖中的演化枝。在計算期間,如果演化枝的終端 (就 name 屬性而言) 相同,則會被視為相同。
例如,假設提供了如下兩個樹狀圖來搜尋它們的嚴格共識樹
tree1: (((A, B), C),(D, E))
tree2: ((A, (B, C)),(D, E))
對於這兩個樹狀圖,_BitString 物件 '11111' 將代表它們的根演化枝。每個 '1' 代表清單 [A, B, C, D, E] 中的終端演化枝 (順序可能不相同,它由所提供第一個樹狀圖的 get_terminal 方法決定)。對於樹狀圖 1 中的演化枝 ((A, B), C) 和樹狀圖 2 中的演化枝 (A, (B, C)),它們都可以用 '11100' 表示。同樣地,'11000' 代表樹狀圖 1 中的演化枝 (A, B),'01100' 代表樹狀圖 2 中的演化枝 (B, C),而 '00011' 代表兩個樹狀圖中的演化枝 (D, E)。
因此,使用此模組中的 _count_clades 函式,我們最終可以取得演化枝計數及其 _BitString 表示形式如下 (省略根和終端)
clade   _BitString   count
ABC     '11100'     2
DE      '00011'     2
AB      '11000'     1
BC      '01100'     1
若要取得演化枝的 _BitString 表示形式,我們可以使用下列程式碼片段
# suppose we are provided with a tree list, the first thing
# to do is to get all the terminal names in the first tree
term_names = [term.name for term in trees[0].get_terminals()]

# for a specific clade in any of the tree, also get its terminal names
clade_term_names = [term.name for term in clade.get_terminals()]

# then create a boolean list
boolvals = [name in clade_term_names for name in term_names]

# create the string version and pass it to _BitString
bitstr = _BitString("".join(map(str, map(int, boolvals))))
若要轉換回
# get all the terminal clades of the first tree
terms = [term for term in trees[0].get_terminals()]

# get the index of terminal clades in bitstr
index_list = bitstr.index_one()

# get all terminal clades by index
clade_terms = [terms[i] for i in index_list]

# create a new calde and append all the terminal clades
new_clade = BaseTree.Clade()
new_clade.clades.extend(clade_terms)
這就是 _BitString 在共識和分支支持演算法中的使用方式。而且我認為它可以用於許多其他情況。
例如,我們甚至可以使用它來檢查兩個樹狀圖的結構是否相同。
# store and return all _BitStrings
def _bitstrs(tree):
    bitstrs = set()
    term_names = [term.name for term in tree.get_terminals()]
    term_names.sort()
    for clade in tree.get_nonterminals():
        clade_term_names = [term.name for term in clade.get_terminals()]
        boolvals = [name in clade_term_names for name in term_names]
        bitstr = _BitString("".join(map(str, map(int, boolvals))))
        bitstrs.add(bitstr)
    return bitstrs


def compare(tree1, tree2):
    term_names1 = [term.name for term in tree1.get_terminals()]
    term_names2 = [term.name for term in tree2.get_terminals()]
    # false if terminals are not the same
    if set(term_names1) != set(term_names2):
        return False
    # true if _BitStrings are the same
    if _bitstrs(tree1) == _bitstrs(tree2):
        return True
    else:
        return False
若要使用它
>>> tree1 = Phylo.read('Tests/TreeConstruction/upgma.tre', 'newick')
>>> tree2 = Phylo.read('Tests/TreeConstruction/nj.tre', 'newick')
>>> tree3 = Phylo.read('Tests/TreeConstruction/pars1.tre', 'newick')
>>> compare(tree1, tree2)
False
>>> compare(tree1, tree3)
True
>>> compare(tree2, tree3)
False
請參閱Biopython 教學中關於序列比對和 BLAST 的章節,以了解此處所示前幾個步驟的說明。
使用 BLAST 搜尋蛋白質序列的同源物。
from Bio.Blast import NBCIStandalone, NCBIXML

query_fname = "AAG35789.fasta"
result_handle, error_handle = NCBIStandalone.blastall(
    "/usr/bin/blastall", "blastp", "/db/fasta/swissprot", query_fname
)
blast_record = NCBIXML.read(result_handle)  # This takes some time to run
從 BLAST 結果中提取最佳比對結果。
from Bio import SeqIO
from Bio.Seq import Seq
from Bio.SeqRecord import SeqRecord


def get_seqrecs(alignments, threshold):
    for aln in alignments:
        for hsp in aln.hsps:
            if hsp.expect < threshold:
                yield SeqRecord(Seq(hsp.sbjct), id=aln.accession)
                break


best_seqs = get_seqrecs(blast_record.alignments, 1e-90)
SeqIO.write(best_seqs, "egfr-family.fasta", "fasta")
為了幫助您稍後對樹狀圖進行註釋,請在此處選擇一個查找鍵(例如,登錄號)並建立一個字典,將該鍵映射到您可以從 BLAST 輸出中收集的任何其他資料,例如分類和 GI 編號。 在這個範例中,我們只保留原始序列和登錄號。
使用 Muscle 重新比對序列。 該程式會以 Clustal 格式建立一個比對檔案 "egfr-family.aln"。
from Bio.Align.Applications import MuscleCommandline

cmdline = MuscleCommandline(input="egfr-family.fasta", out="efgr-family.aln", clw=True)
cmdline()
使用 PhyML 推斷基因樹。 首先,將步驟 3 中的比對轉換為「放鬆的 Phylip」格式(Biopython 1.58 中的新格式)。
from Bio import AlignIO

AlignIO.convert("egfr-family.aln", "clustal", "egfr-family.phy", "phylip-relaxed")
使用命令列包裝器將比對結果饋入 PhyML。
from Bio.Phylo.Applications import PhymlCommandline

cmdline = PhymlCommandline(
    input="egfr-family.phy", datatype="aa", model="WAG", alpha="e", bootstrap=100
)
out_log, err_log = cmdline()
使用 Phylo 載入基因樹,並快速查看其拓撲結構。(PhyML 會將樹狀圖寫入一個以輸入檔案加上 "_phyml_tree.txt" 命名的檔案中。)
from Bio import Phylo

egfr_tree = Phylo.read("egfr-family.phy_phyml_tree.txt", "newick")
Phylo.draw_ascii(egfr_tree)
將登錄號和序列新增到樹狀圖中 – 現在我們正在使用 PhyloXML 的額外功能。
from Bio.Phylo import PhyloXML

# Promote the basic tree to PhyloXML
egfr_phy = egfr_tree.as_phyloxml()

# Make a lookup table for sequences
lookup = dict((rec.id, str(rec.seq)) for rec in best_seqs)

for clade in egfr_phy.get_terminals():
    key = clade.name
    accession = PhyloXML.Accession(key, "NCBI")
    mol_seq = PhyloXML.MolSeq(lookup[key], is_aligned=True)
    sequence = PhyloXML.Sequence(type="aa", accession=accession, mol_seq=mol_seq)
    clade.sequences.append(sequence)

# Save the annotated phyloXML file
Phylo.write(egfr_phy, "egfr-family-annotated.xml", "phyloxml")